
This article has come about after conversations with multiple people about Power Apps. On the whole most people that I engage with like Canvas Applications. This tends to make sense as I come from a SharePoint background. So when I start to talk about Model Driven Apps people seem to shy away.
This article isn’t going to weigh in on the cost of model driven apps vs canvas apps, but to keep it simple creating a model driven application will usually cost more than a seeded canvas app as part of a Office 365 subscription. More around licencing can be found from the Microsoft Power Apps and Power Automate Licencing Guide.
Firstly, I’d like to get this out of the way – I am not a Dynamics Consultant; but a SharePoint Consultant that has become pretty fond of model driven apps and also pretty fond on Canvas Apps.
Please Note
Microsoft have gone through a recent rebrand with naming of ‘things’ in the Power Platform. Please see this table to see what the previous was and what the current name for it is – as of 16 Dec 2020.
| Old | New |
| Common Data Service | Dataverse |
| Entity | Tab |
| Field | Column |
| Option Set | Choice |
| Multi Select Option Set | Choices |
What is this article covering
This article will go through and create a model driven application in the Power Platform. This will be a simple Model Driven Application that will demonstrate how easy creating a Model Driven Application can be.
The mock business process / system that this article will create is a Car Dealership System. At the end of this article the following will be possible in the model driven application:
- Store all the cars that are available to buy on the forecourt
- Store customer interest against a car
The main aim of this article is to create a simple, functioning Model Driven Application. In later articles this will be extended to highlight more complex features of Model Driven Applications.
The fabricated company name is Wheels Car Lot.
Getting Started…
Now for the fun stuff.. We are going to create a Model Driven App. To create a model driven app you will need the following:
- O365 Tenant that has Power Apps
- A premium licence to Power Apps
- You can create this application as part of a trial
Creating a Power Platform Environment and Solution
1. Navigate to the Power Platform Admin Centre of your tenant: https://admin.powerplatform.microsoft.com/environments
2. Select Environments > New
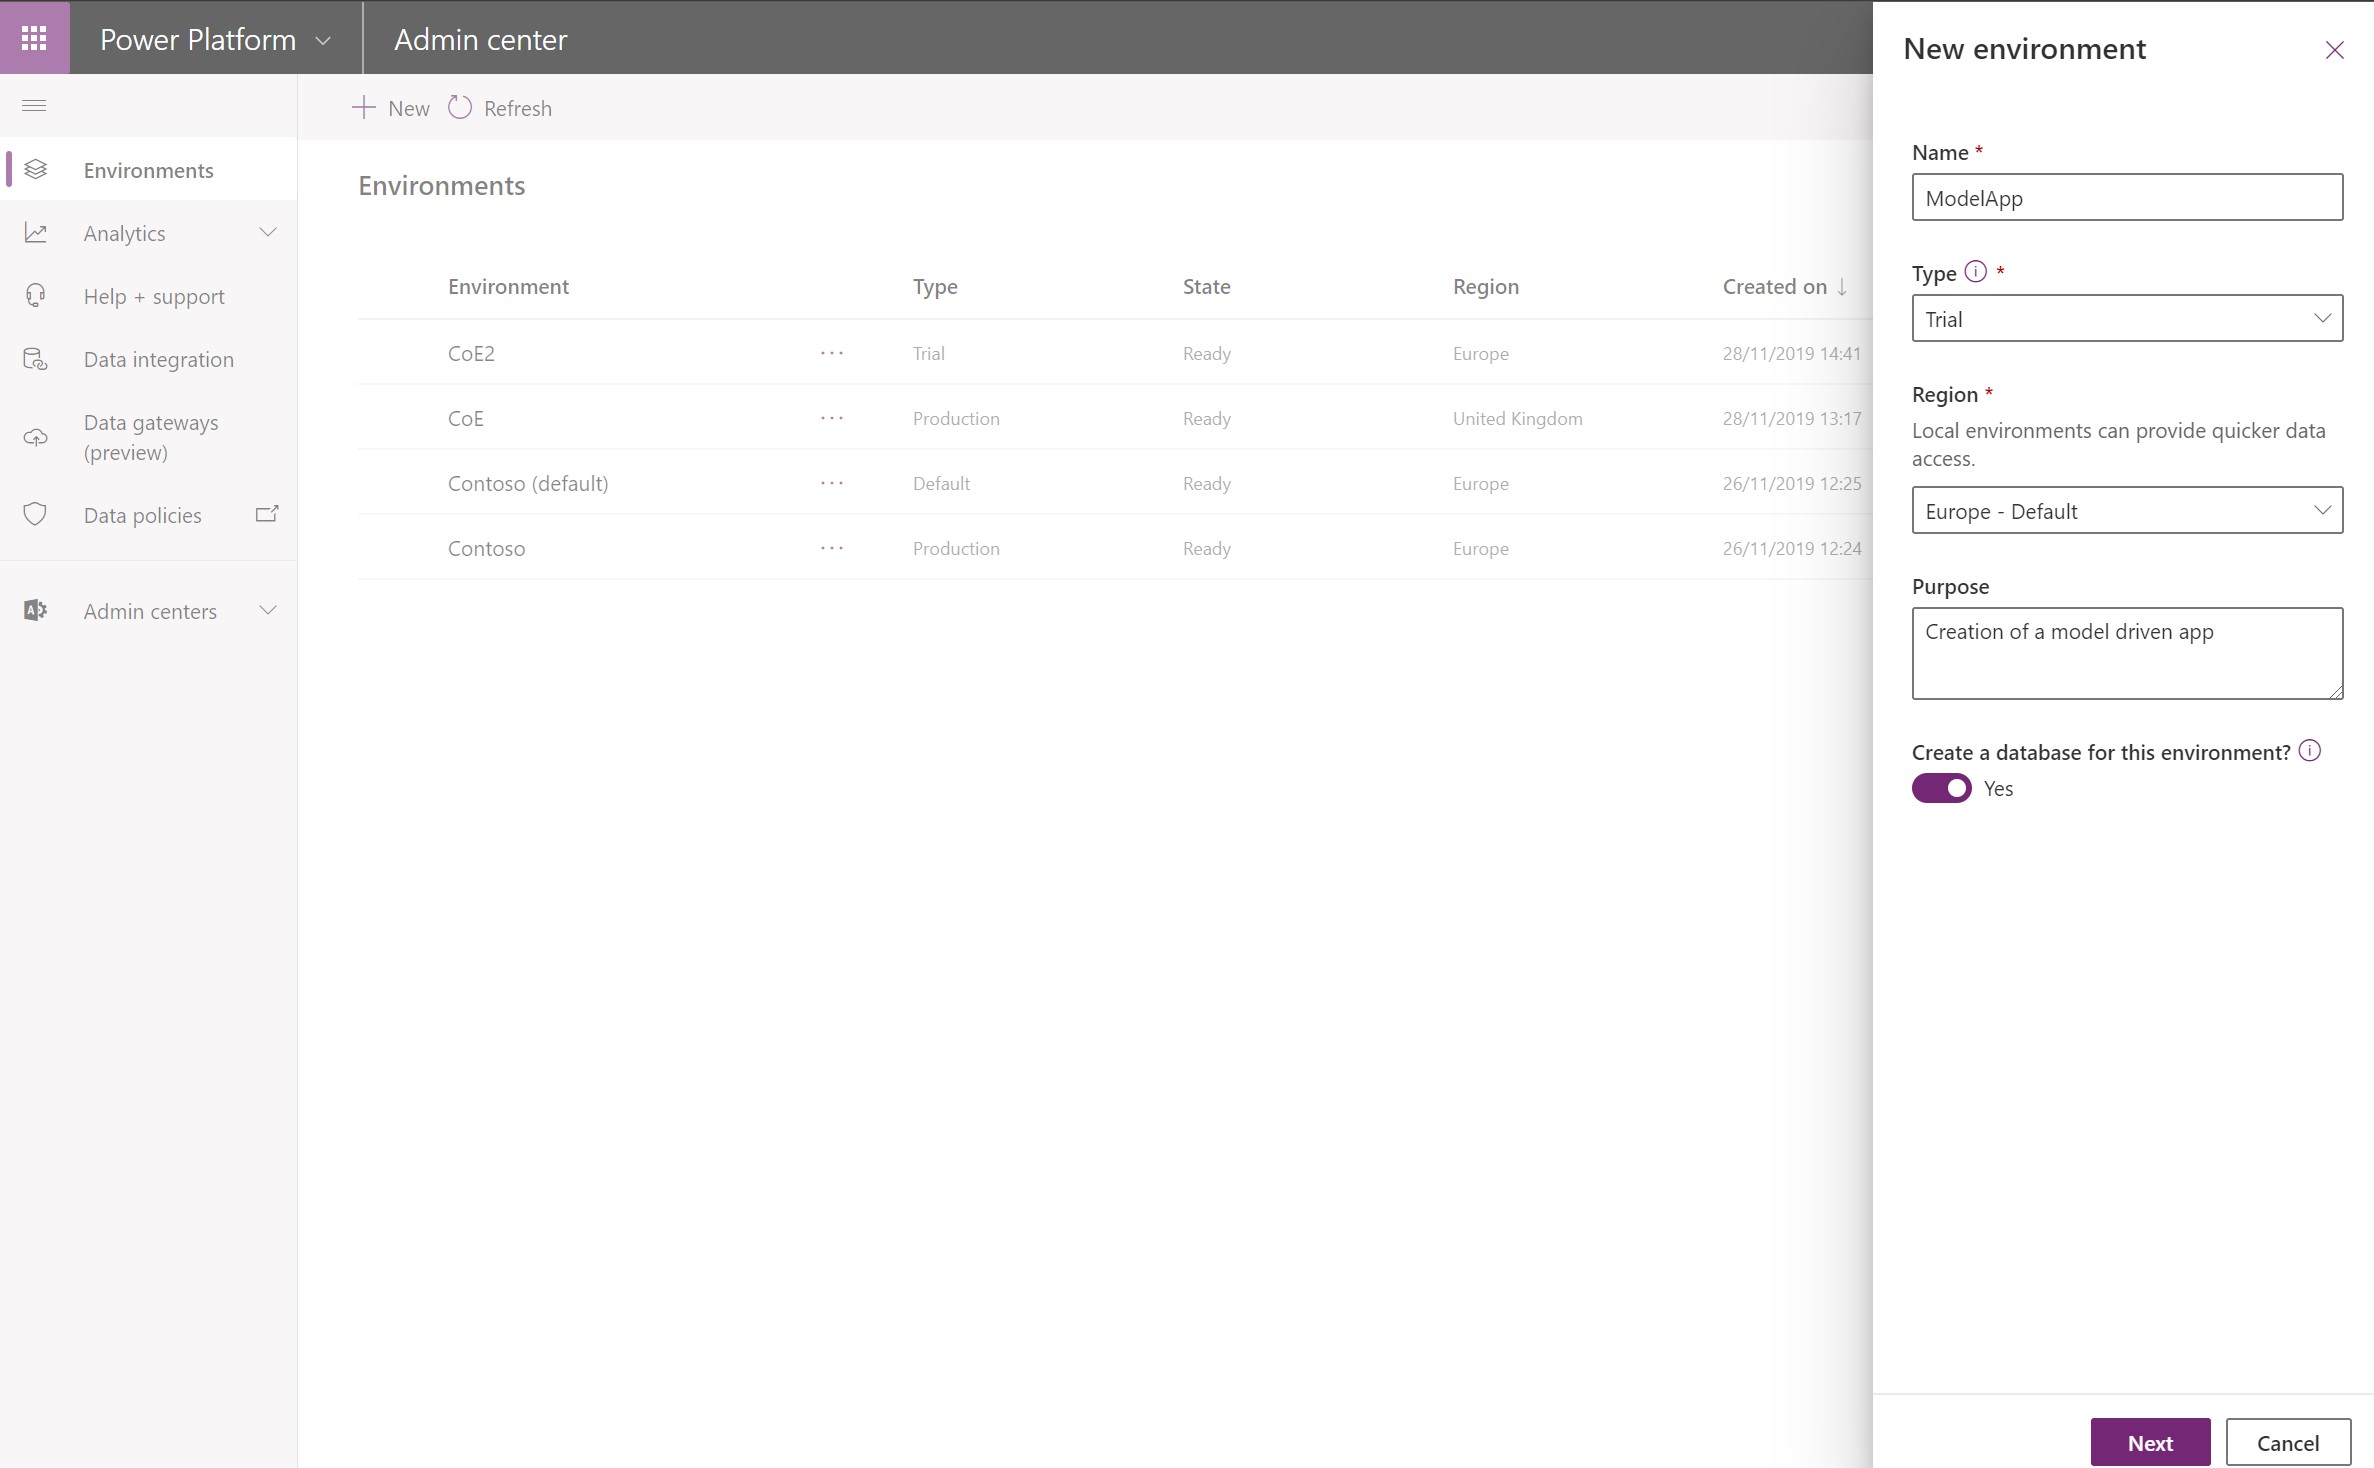
Enter in the details on the right hand flyout appropriate for you.
Type: Trial
| Type | Trial |
| Create a database for this environment | Yes |
3. Once created navigate to the environment. This can be done by navigating to https://make.powerapps.com
Select the environment name in the right hand flyout after you have selected the current environment name. This can be seen on the left to the alerts icon in the ribbon. After the correct environment has been selected navigate to solutions. This can be found in the bottom left of the left hand menu.

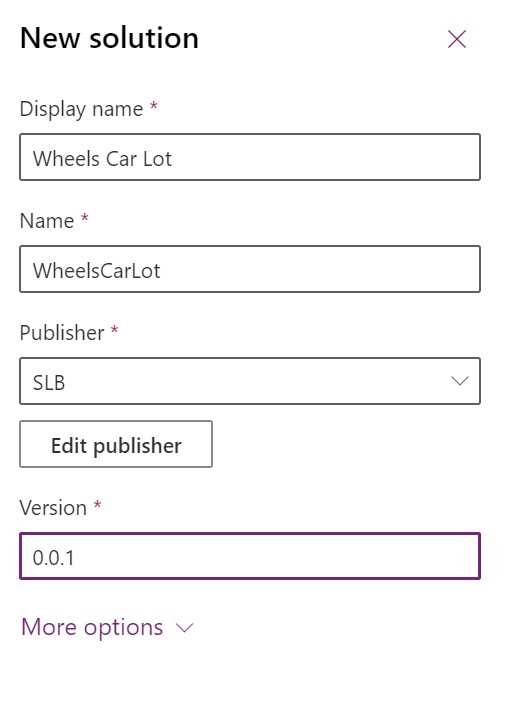
4. A solution will now be created. A solution has a few key benefits, but for the purposes of this article it allows you to easily see all the components that make up a model driven application in a single screen.
Solution Name: Wheels Car Lot
Publisher: <<Create New>>
New publisher settings
— Display Name: SLB
— Prefix: slb
Version: 0.0.1
Tip: The publisher is what will appear in the internal name of each entity and field that you create. For example if you create a field called Car Colour the internal name would be slb_carcolour.


Entities
Model Driven Applications require entities. They can’t connect to other services as a data source, so you must create Entities to store the records of information against. In basic terms an entity is a table of data. An Entity consists of more than just fields and consists of the following main parts (can’t think of the proper word for what they represent):
- Fields
- Relationships
- Business Rules
- Views
- Forms
- Dashboards
- Charts
- Keys
This article will show how to edit or create fields, relationships, views and forms. A more in depth look at the other parts will be in a follow up article to this.
When you want to create a form or view for a model driven application this is actually created against the entity. The Model Driven Application is way of defining what components make up an application. This means that almost all the customisations for an Entity can be found in that entity.
Creating Entities
In this section we will create the entities required for Wheels Car Lot. The following entities are required for creation:
- Vehicle
- Make
- Model
Creating and configuring the ‘Car’ entity and Car entity fields
This section will go through how to create the Car entity and the fields that will be required for the car.
- Navigate to the solution that you created in the previous step.
- In the Ribbon select New > Entity

Rename the primary field to Vehicle Registration and click Create. It will take a few seconds for the entity to create – maybe time to grab a coffee or a beer?
Tip: In the Name field you can see that there is a grey section with the characters ‘slb_‘ this is the published that we created in the earlier step.
Once the entity is created a host of default fields will have been created. This is similar to when using a SharePoint list that a number of fields get created by default to.
Option set to create:
| Option set name | Values | Description |
| Colour | Red Black Blue Silver | The colour of the vehicle |
| Vehicle Type | Car Motorbike Van | Type of vehicle |
| Number of doors | 0 1 2 3 4 5 | Number of doors that the vehicle has. |
Tip: An option set is basically a choice column. However, option sets can be reused across multiple different entities. So if you created a gender option set this could be used in multiple different entities.
Fields to Create:
| Field Display Name | Type | What is this column? |
| VIN | text | Will store the vehicle identity number |
| Buy Value | Currency | The value that the vehicle was brought for |
| High Sell Value | Currency | The highest value the vehicle could be sold for |
| Low Sell Value | Currency | The lowest value the vehicle could be sold for |
| Number of Doors | Option Set – Number of Doors | The number of doors the vehicle has |
| Colour | Option Set – Colour | The colour of the vehicle |
| Vehicle Type | Option Set – Vehicle Type | The type of vehicle |


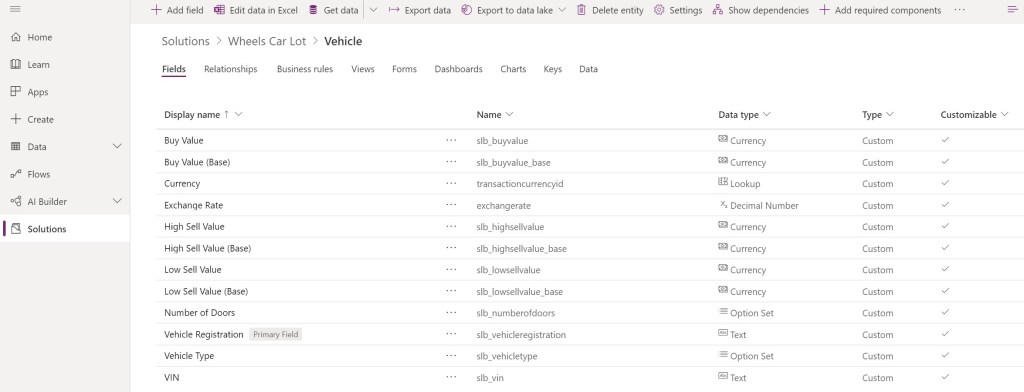
Once all the fields have been created for the Vehicle entity the other entities need to be created.
Creating and configuring the ‘Make’ Entity
Entity Name: Vehicle Make
Primary Field: Manufacturer
No additional fields required at current.
Create and configuring the ‘Model’ Entity
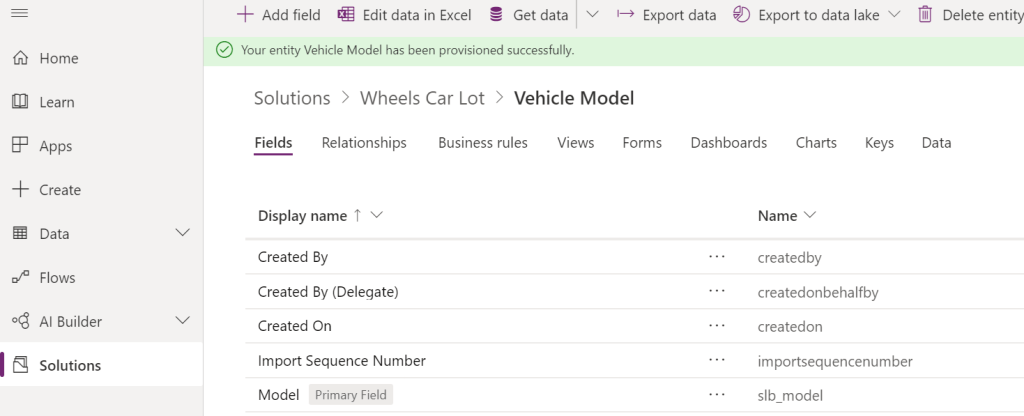
Entity Name: Vehicle Model
Primary Field: Model
There is a relation between the Make and Model of a vehicle. This relation is known as a one to many. This is because a manufacturer can have many different models of vehicle.
Creating many to one Relationship to the Vehicle Make entity.
Navigate to the Relationships tab in the Model entity.
Once the relationships tab is selected select New > Many to one.
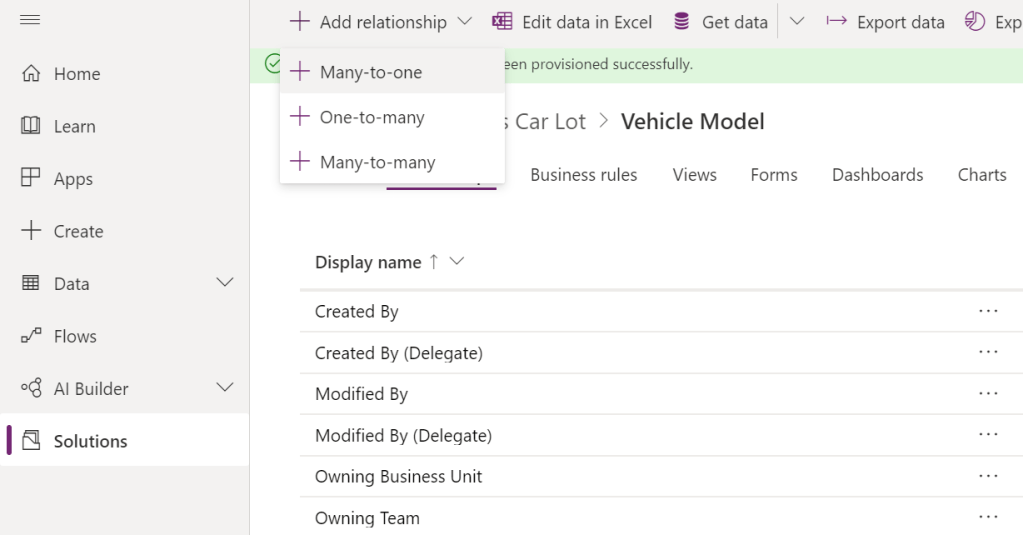
In the Many-to-one configuration window select the Related entity to Vehicle Manufacturer.

Adding the Model and Make as Lookups to the Vehicle Entity
Navigate to the Vehicle entity and select the fields tab.
Select New Field > Name: “Make”, Type: Lookup, Related Entity: Vehicle Manufacturer > Save
Select New Field > Name: “Model”, Type: Lookup, Related Entity: Vehicle Model > Save
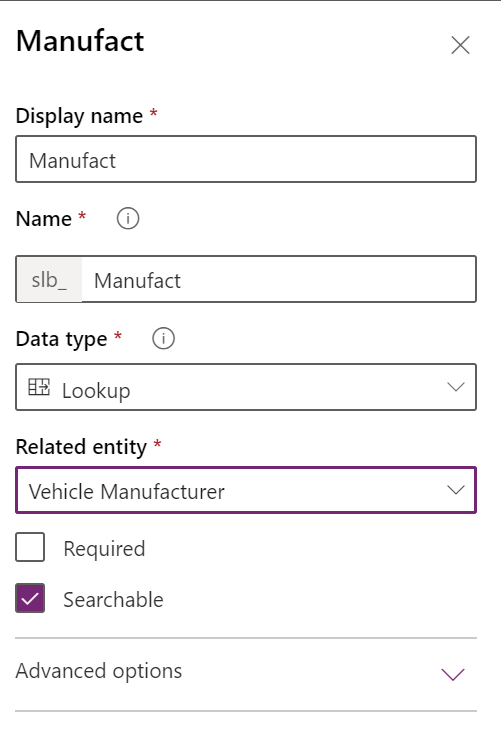
The two lookup fields have now been created.
Configuration of the entities that we have created
Now that we have created our initial entities we need to configure the forms and views so that we can add the required data to the records that we create.
Navigate to the Vehicle entity and select the Forms tab.

Select Add Form > Main Form. This will open a new window to create the form.
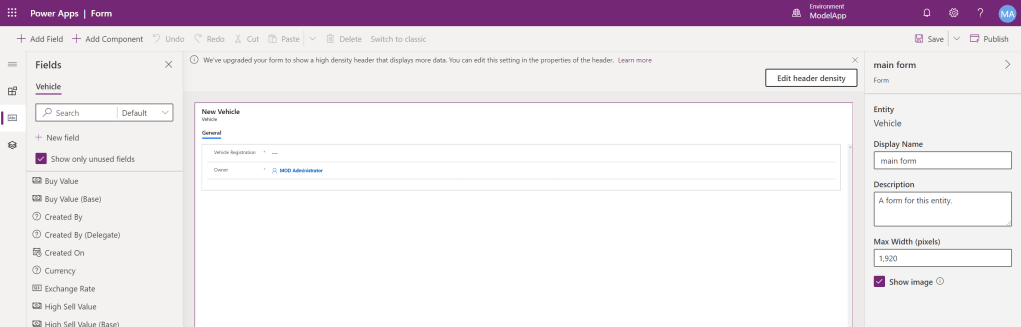
In the most right hand panel configuration options are visible for the currently selected control. In the left panel are the options available based on the expandable options. The three options available here are; Components, fields and tree views.
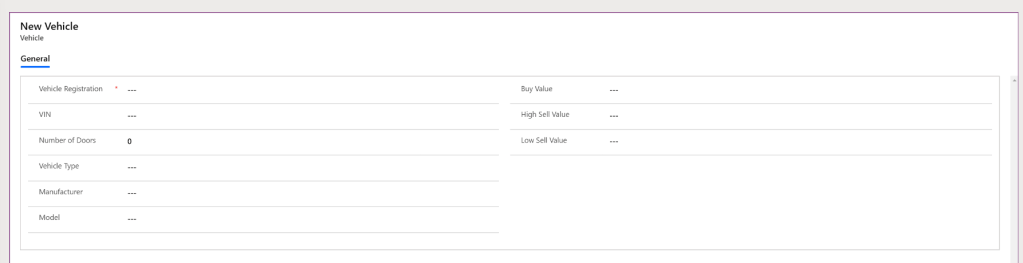
Rename the form Display name to: Vehicle Form Wheels Car Lot.
Add the following the fields to to the form:
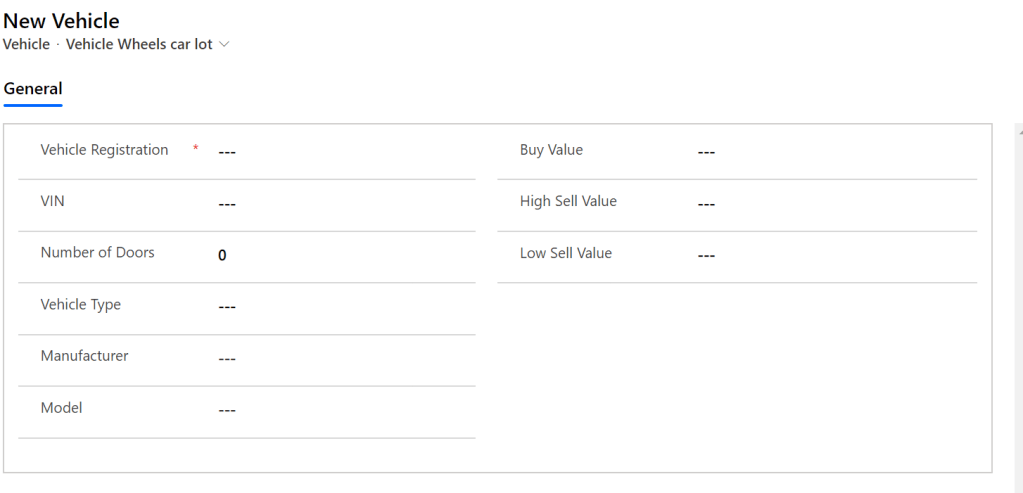
Vehicle Registration, VIN, Number of Doors, Vehicle Type, Buy Value, High Sell Value and Low Sell Value, Manufacturer and Model
Then select Save and Publish in the top right hand side.
The structure of a form:
Tabs – these are what become visible at the top of the screen. Addition tabs could be added to the Vehicle entity that support additional requirements such as; Interest in vehicle, Service history ect…
A tab can be set to a number of columns, 1, 2 or 3. A width percentage can be set against each number of columns you decide.
Sections: Sections are what site inside tab columns. A section can also contain a columns. A section can have between 1 and 4 columns. However, you aren’t able to set the width percentage against a column in a section.
In the example for the Vehicle form I have a single column tab and a two column section.
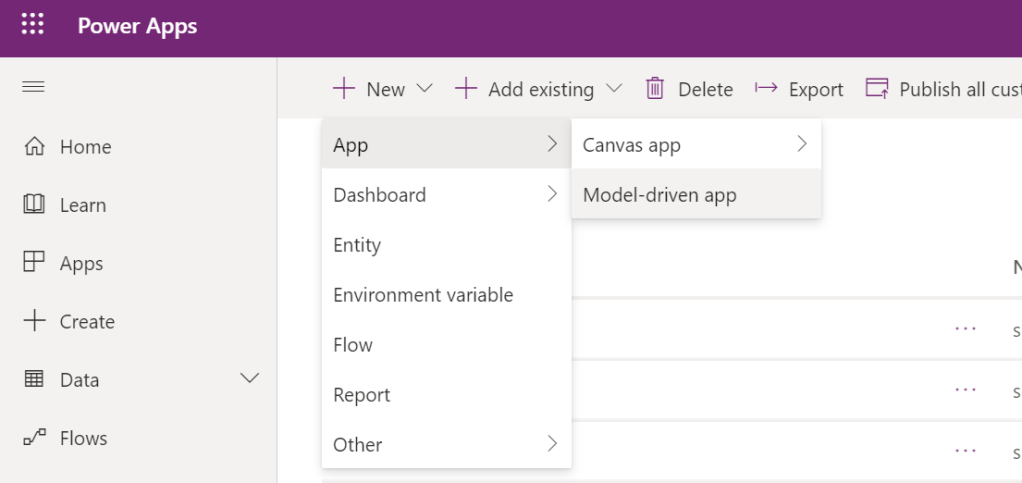
Creating a Model App
Now, for the fun bit. The creation of the model driven application.
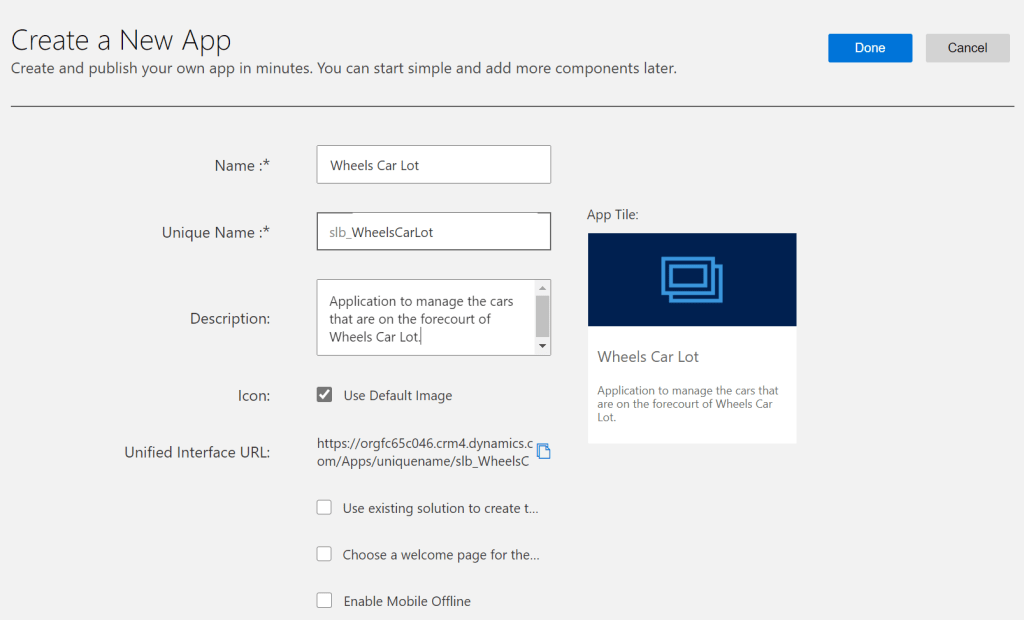
Navigate to the solution Wheels Car Lot. Select new > app > model-driven app.
Name: Wheels Car Lot
Description: Application to manage the cars on the forecourt of Wheels Car Lot.
Select Done
Now the Model-driven app has been created it needs a site map to be configured. Select the Pen icon next to the Site Map button. This is usually highlighted red when a Model-driven app is created.
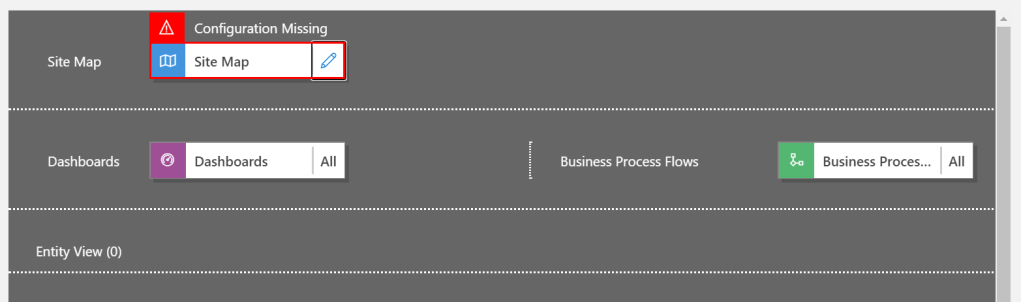
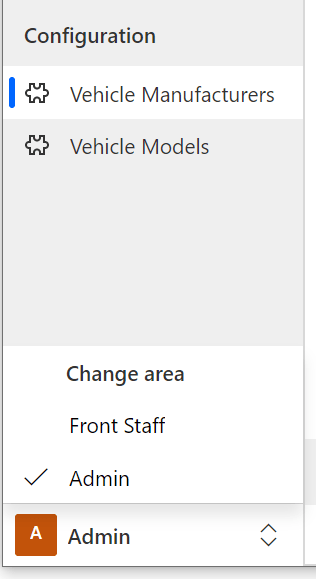
What is a Site Map: A site map is the navigation element that is visible on the left hand side of a Model-driven application. A site Map has Areas, Groups and Subareas. An Area is the highest level of navigation and allow you to navigate to a different part of an application by a selector located at the bottom left of the screen.
In this application, two areas will be created. A ‘Main Staff’ section which will be a list of all the vehicles. The second Area would be a ‘Admin’. The admins will be able to create the vehicles manufacturers and vehicle models.
Groups are ways of grouping different subareas.
So this means, An Area can have many Groups, A Group can have many Subareas.

To configure the Site Map:
Create two Areas:
“Front Staff” and “Admin”
Select the Admin Area and create a Sub Group called: Configuration
Select the sub group and add in two Subareas.
Select the first subarea and change the entity property on the right hand side to Vehicle Manufacturers.
Select the second subarea and change the entity property on the right hand side to Vehicle Models.
Select the Area ‘Front Staff‘ and then add a Group called General
Under the General group add a subgroup and configure the entity to Vehicle
After configuring the site map ensure that you Save and Publish it. These are done in the top right of the editor and then select Save and Close.
Once back in the App Designer window three entities will have appeared. Again, Save and Publish. Then select ‘Play’.
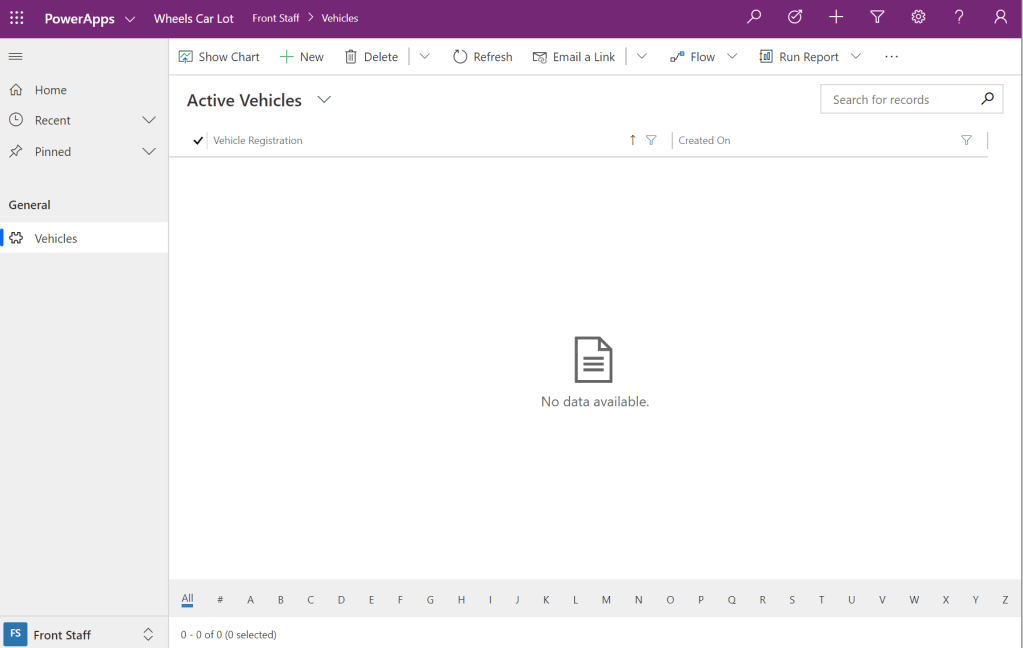
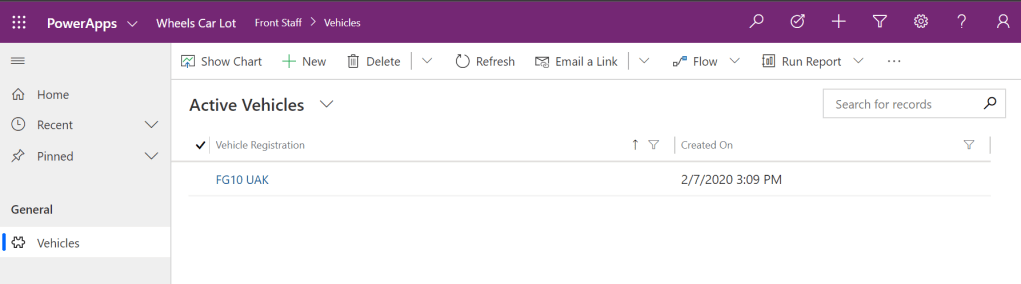
As you can see the model driven application has been created. First we need to go and add some data to the admin section so that we can select a manufacturer and model.
Select the bottom left ‘Front Staff’ and change it to Admin.
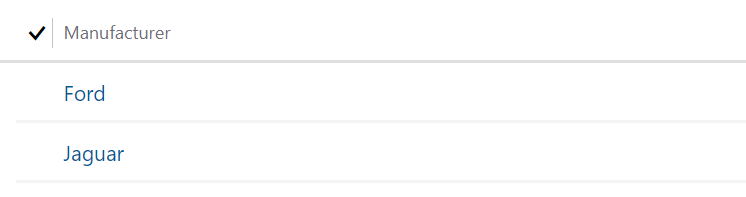
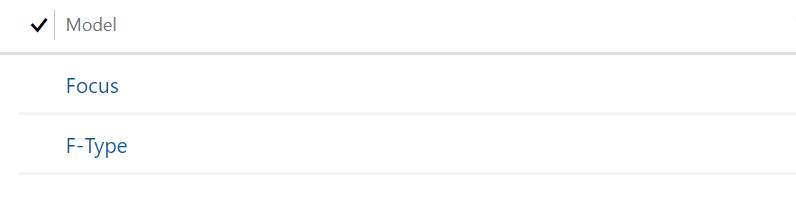
I created two models and manufacturers.
Navigate back to the Front Staff area and add an item. This will show the form that we created earlier.
Go ahead and create a few different vehicles entries and then navigate back the home (This button is seen in the top left).
Summary!
You have now created your first model-driven app. Obviously, this is a very simple example on creating a model driven application and the entities that support a model driven application. I’ll be doing further blogs on more granular parts of how to make Model-driven applications better.
Do you want me to cover something? if so let me know by getting in touch on twitter!
Other articles:
